Tennis Rackets. Airplanes. Supercars.
What do all of these have in common? One answer is: they can all be made from carbon fiber. Carbon fiber reinforced polymer composites are strong, stiff, and lightweight, making them ideal for aerospace and other high-performance applications. In addition to these properties, carbon fiber composites can also be molded into complex shapes. This is both a blessing and a curse: while this capability makes it perfect for the compound curves of our solar cars, it also necessitates using a mold. In this series of blog posts, we will walk through the process of designing and manufacturing molds for our 9th-generation solar car, Tachyon.
When we began the process, we already had a simple understanding of molds: the mold needed to match the outside shape of the final vehicle, because the molded carbon fiber composite would take on both its geometry and surface finish. The carbon fiber will be placed on the inside of the mold in order to achieve a smooth exterior for better aerodynamics. A mold like this is known as a “negative” or “female” mold, in contrast to a “positive” or “male” where the molded part will be smooth on the inside.
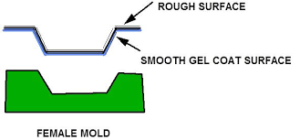
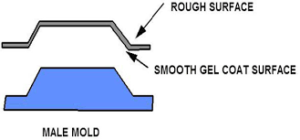
Image: www.performancecomposites.com
Furthermore, the mold needs to be removable once our car has been molded. For example, a ball cannot be molded with a single exterior mold: there would be no way to get it out once it’s done! Instead, the mold needs to be split into multiple pieces based on draft angle, which is the difference in angle between a mold surface and the vertical plane. The draft angle cannot be negative, or the part will stick inside the mold. A 2 degree positive draft angle will ensure release in most cases.
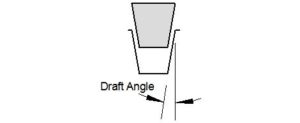
Image: www.concretecountertopinstitute.com
Similarly, we had to split Tachyon’s molds into multiple parts in order to get the exact shape that we needed. There are many ways to cut the division lines, and we were lacking in experience: almost all the members who made our last set of molds had already graduated. We started by imitating our previous car’s molds, and divided Tachyon in half horizontally through the widest point.
This gave us mixed results. It worked well for previous vehicles, whose main shells were modelled after wings. They had a defined “widest point” and relatively simple geometry. However, our first-ever cruiser class vehicle had a shape closer to that of a family car. This division line would have been difficult to designate on the mostly-vertical sides of the car, and impossible to implement on the complex nose curvature. Furthermore, the line would have run right through the doors of our car, making each door half difficult to align and join.
Fortunately, we were able to benefit from outside expertise. Goldshield Fiberglass Inc. advised us extensively throughout our design process, and recommended splitting the shell into quarters.
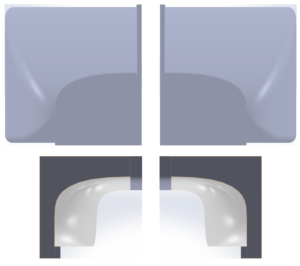
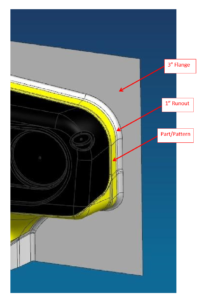
This resolved our problem with draft angles in the nose, and also moved the cut lines to avoid most of our doors and panels. A beneficial side-effect was the reduction in width for each individual mold: this would make it much easier for us to reach the center of the mold when sanding or polishing it. Goldshield Fiberglass also showed us how to account for runout, to allow room for trimming of the molded part. Finally, they suggested a variety of ways for precisely locating parts within a mold, and for aligning adjacent molds in a multi-mold setup.
We would like to thank Mike, Rick, and the rest of Goldshield Fiberglass Inc. for all of their help with our molds design! Their emails and video calls taught us a lot, and greatly improved our mold designs. Goldshield’s logo is proudly displayed on our website as a token of our appreciation for their sponsorship, and we recommend heading over to www.goldshield.com for more information on their custom molded composites.
![]()
With our division geometry finished, we added flanges to the sides of the molds to provide space for vacuum tape and other vacuum bagging materials. Stay tuned for our next post to see how we chose materials for our molds and manufactured our mold patterns!